
4 Piston Brake Caliper Conversion, [©2005 Lye, Janssen, Masters, and Teasdale]
by R. John Lye and Lee Janssen,
with input from Dan Masters and Dean Teasdale.
Four piston brake caliper conversion for TR3/3A/4/4A/250 and 6.
First, in our current litigious society I feel that I must point out that the neither of the authors are brake experts, nor are we automotive engineers; as such, follow these instructions at your own risk. The braking system on your car must function correctly to avoid serious injury; if you do not feel competent to do these modifications correctly, please either stick with the stock brake system or have a professional do the work for you.
In the quest for better braking on our cars (autocross prepared TR-4 and high performance, street driven TR-6 respectively), we began looking into converting our cars' braking systems to four piston front brake calipers. While there are several sources of commercial conversions, especially in England, and there are race calipers like Wilwood and AP that we could have used, we were looking for a simple, cost effective solution. We discovered that the calipers from a 1979-83 Toyota four wheel drive pickup (any non-diesel model) are almost a bolt-on conversion. These calipers are readily available, and are relatively inexpensive; at this time (2000), they should cost about $39.95 at your local auto parts store (plus about a $20 core charge). You will also have to buy a "hardware kit" for a few more bucks to get the pins that hold the pads (one kit per car). Some suppliers offer a "loaded" caliper which includes the hardware kit and pads; if so, this is likely to be more cost effective than buying them separately (if you are going to stick with the stock-type brake pads that will come with the caliper). Junk yard calipers make good cores, and you may be able to get them for less than the core charge, thereby saving yourself a few more dollars.
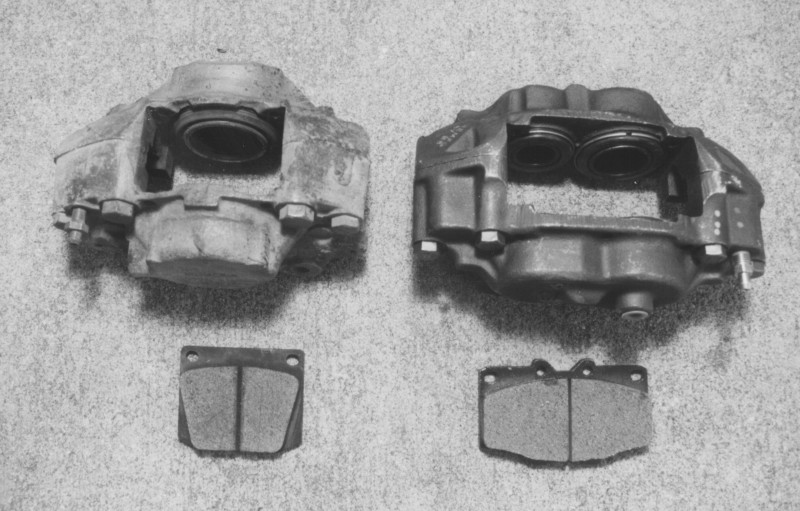 |
Figure 1 Comparison of the Girling brakes and the Toyota brakes. The Girling brake caliper and pad are on the left and the Toyota caliper and pad are on the right. The Girling caliper is a two piston design while the Toyota uses four pistons. In addition, the much larger pad area of the Toyota caliper should be obvious. Despite this increase in size, the Toyota caliper is not appreciably heavier than the Girling caliper, and may even be lighter. |
There are four things that need to be done to fit these calipers to the Triumph uprights (late TR-4 through TR-6; see note #5 below for early cars):
1. The Toyota mounting bolts are 12 mm, rather than 7/16", so our first solution was to make up some reducing bushings to fit into the ears of the caliper to bring it down to the 7/16 ID. These bushings have a 12 mm OD and a 7/16" ID and were made from mild steel. However, there is a better solution: there were three types of calipers fitted to the TR-6 range. The first was the Girling 16P (which was fitted until 1969) followed by the Girling 16PB (which was fitted until 1973). Both of these calipers had "Imperial" threads. After 1973, TR-6's got the Girling M16P caliper, which had metric fittings. So far, so good. The interesting thing is that there are different mounting bolts specified for the different calipers: Stanpart number 113142 is specified for both the 16P and the 16PB (ie, the "Imperial" thread types), while Stanpart number 158668 is specified for the M16P (these are the factory part numbers). Here are measurements of the relevant diameters:
Toyota caliper mounting bolt hole inner diameter (measured 2): |
0.478", |
0.479" |
71 TR6 caliper retaining bolt (113142) shank outer diameter (measured 1): |
0.433" |
. |
74 TR6 caliper retaining bolt (158668) shank outer diameter (measured 2): |
0.472", |
0.469" |
The latter bolt has a metric (12 mm) shank but has 7/16" threads and it fits the Toyota calipers perfectly. These bolts should work to mount the Toyota calipers to the TR-2/3/4/4A/250 uprights as well as to the TR-6 uprights. I just wish I'd known about these bolts before I made up those bushings! One drawback is that the hybrid metric/inch bolts are more than twice as expensive as the standard bolts. They are almost certainly cheaper than paying a machinist to make up a set of reducing bushings, though.
2. The bleeder bolt uses a 10 mm wrench instead of the standard 7/16" wrench, so you'll need to buy one of those if you don't already have one.
3. If you are fitting these calipers to a TR-3/3A/4, you'll need to make up a flex line that is SAE (or AN-3) at one end, and metric at the other end. The Toyota caliper uses a 10 X 1.0 inverted flare fitting, which is a bit hard to find as a fitting for braided lines. If you want to use a straight end right on the line, Earl's part number 640803 will work (this should be available from many of the race supply shops such as Summit Racing, TSI Imports or Porterfield). I wanted to have a 90 degree end on the autocross-prepared TR-4, so I used a metric to -3, male to male adaptor that I got from Porterfield; their part number for this fitting is 420103. To be sure that it sealed, I backed it up with a dowty washer. If you are fitting these calipers to a TR-4A/250 or TR-6, your job will be a bit easier. These cars use a short piece of hard line that goes between the caliper and the flex line. For these cars, you can simply buy a length of metric brake line from your local auto parts store. Cut the female SAE end off your current hard line and cut one of the ends off the new metric line (cut the metric line to the proper length at this time). Put the female SAE end on the piece of metric hard line and form a new flare (be sure to make the proper double flare with a good quality flaring tool; this is essential to get a good seal). If you are not sure how to make up brake lines, be sure to get a professional to do this for you; it is essential that the brake lines seal and function properly.
4. Finally, the brake dust shield needs to be trimmed to clear the larger Toyota calipers. See figure 2 for a trimming diagram; the white areas in the figure should be removed. Alternatively, the dust shield may be left off if you prefer.
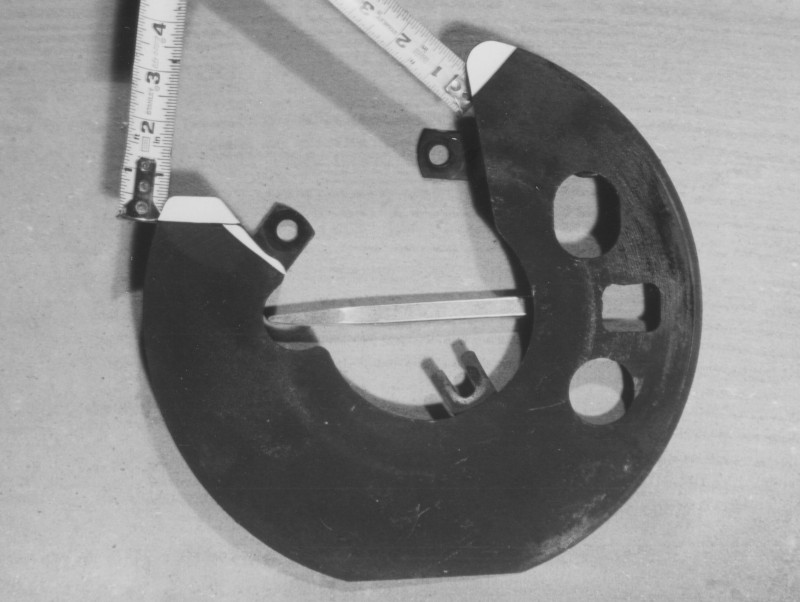 |
Figure 2 Dust shield modifications. This is the dust shield from a TR-6 (TR-3 and TR-4 shields are similar) that has been modified to clear the larger Toyota caliper. The pieces in white must be trimmed from the dust shield in order that it will fit over the caliper. On a race car or an autocross car, it may be possible to leave this piece off entirely without any problems. |
5. In addition to the above instructions, to fit the Toyota calipers to a TR-3/3A or early TR-4, you will need to do two more things. You will need to use the later brake caliper mounting plates (Stanpart part numbers 133499 and 133500). These were used on the late TR-4 through TR-6 cars, but they will bolt right up to the earlier vertical links. I'm not sure if these are available new anymore; used parts may have to be sourced for these. In addition, the early cars (the ones that used the calipers where the pads are retained by small metal hold down plates which are bolted to the caliper, NOT by pins like the TR-6) used a larger diameter rotor. You will need to change to the later TR4/A/250/6 style rotor; these are available from the usual sources (The Roadster Factory, Moss Motors, etc.) and are even available cross drilled if you'd like to get fancy. One more note, TR-3B's may already have the later caliper mounting bracket and smaller diameter rotor; if you have a TR-3B, you should check before buying new parts - if the brake pads are held in place by pins, you're all set; if they're held in place by metal hold down plates, you'll need to convert as described above.
That's it. It is quite an easy conversion, and the pads are readily available from all the usual sources (Carbotech, Porterfield, TSI Imports, etc.); both standard-type and racing pads are available, as this is apparently a common conversion for the Datsun Z-cars.
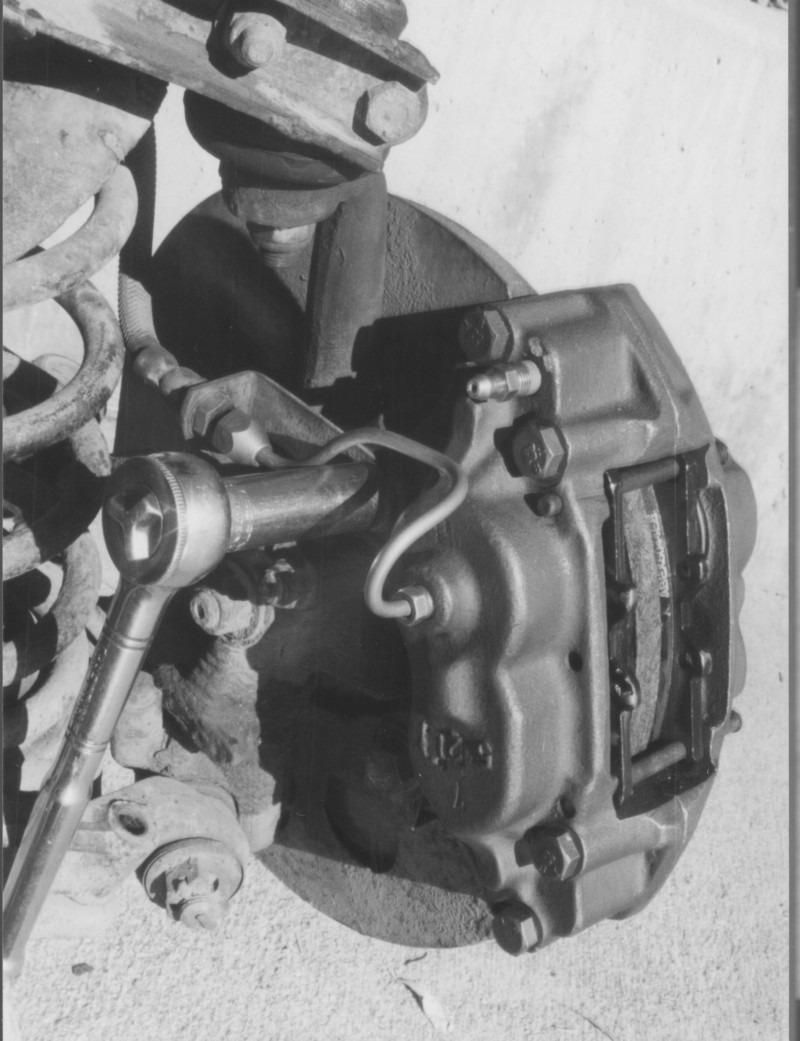 |
Figure 3 The completed installation. This is what the Toyota caliper looks like when mounted to a TR-6 front suspension (the 3/8" ratchet and socket are included as a size reference). As you can see, the conversion looks quite sanitary when completed. |
We have performed some braking tests on this conversion. Braking test summary is as follows:
The distances are based a 74 TR6 running at 3000 rpm in 4th gear with a 3.45 differential and 205-70 R15 tires. The tire weight distribution was as follows:
L front: 660 lbs |
R front: 620 lbs |
L rear: 780 lbs |
R rear: 720 lbs |
Front wheel camber was set to 3/8 degree positive.
All tests were performed with a newly rebuilt master cylinder, using DOT 5 brake fluid. The variations tested and the results of the testing were:
1. Early (prior to metric calipers, Girling 16PB) stock configuration with semi metallic pads, composite shoes and 0.70" rear wheel cylinders: 262 feet with a standard deviation of 19; 6 data points, tossed out both the minimum and maximum measurements.
2. Toyota front calipers with semi metallic pads, composite shoes: 243 feet with a standard deviation of 9; 8 data points, tossed out minimum and maximum.
3. Toyota front calipers with semi metallic pads, composite shoes with a 7/8 inch rear wheel cylinder: 215 feet with a standard deviation of 9; 9 data points, tossed out minimum and maximum.
As you can see, there was a significant performance advantage to the four piston caliper conversion. Since the pad surface area is much larger, this performance differential should increase if the brakes are used a lot and begin to heat up. One observation worth noting is that the pedal travel increased as the size of the calipers and rear wheel cylinders increased. This was initially a little alarming but it was fine once you get used to the new feel. Since the first car that this conversion was performed on (autocross prepared TR-4) had already had rear disc brakes fitted, we were not sure what we would need to do as far as adjusting the brake bias for the drum brakes on the rear of the street driven TR-6. A proportioning valve was installed on the rear brake lines of the TR-6 used for the brake tests above, but it was set to have no effect (completely backed out). We were concerned that the 7/8" rear wheel cylinder might cause the rear brakes to lock up; however, this turned out not to be the case. While we have experienced no brake balance problems associated with this conversion, others might find it necessary to install a proportioning valve to adjust the brake balance if consistent wheel lockup is encountered. To sum up then, we are quite satisfied with the performance of the Toyota four piston front brake calipers when fitted to our Triumphs. Once all the parts are collected and in hand, it should be relatively easy to do the swap in less than a weekend.
Sources for parts mentioned in the text:
Porterfield: |
1-800-537-6842 |
Summit Racing: |
1-800-230-3030 |
The Roadster Factory: |
1-800-234-1104 |
Moss Motors: |
1-800-667-7872 |
Carbotech Engineering: |
1-954-493-9669 |
TSI Imports: |
1-800-543-6648 |
R. John Lye, rjl@gt-classics.com
|